TA Basics: Setting up a test automation framework in seconds with lapis_lazuli
By reading my previous blogposts, you are now ready to start your test automation adventure for real. Ruby is installed, the browser and webdrivers are installed and in place, the lapis_lazuli gem is installed which also takes care of cucumber, selenium-webdriver, watir and some other needed gems, you know how to write scenario's in Gherkin. YES! You are as ready as you can be. So it's time to get started and see the whole setup in action.
Given(/^the user navigates to (?:the )?"(.*?)"(?: page)?$/) do |page|
Nav.to(page)
end
And in the navigation helper you see:
Then in the step definition we put in a bit more logic and make it a bit more "codey" since we start to refer to functions form the helper. We define all the steps that needed to be taken, in this case only one.
And last you have the helper the one that contains the functions, in this case the function "to" which we use for navigation. In the helper we do all the codey stuff. Like getting the correct item(s) from the config files, making sure the browser performs the navigation action and if needed a refresh and last but not least wait for the url to be loaded.
This way, even a manager can help writing feature files. the steps can are easy to adjust is needed without coding to much, and all the codey stuff only has to be maintained in the helper and can be reused by as many scenario's/steps as needed.
Create and run
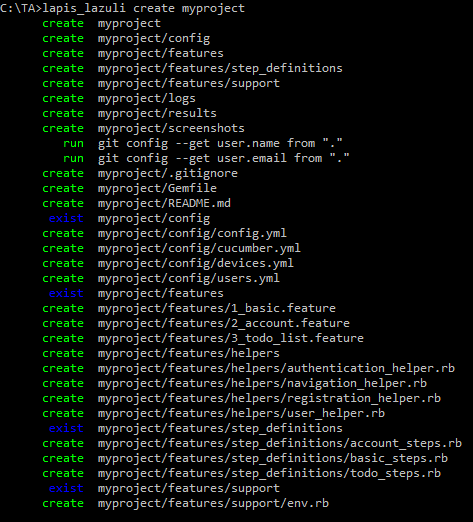
Create a project
Some blog's explain all different aspects of the files and folder structure you need for test automation with cucumber. And basically you could just put everything into one *.rb file and run it. But I like to show you a simple way to create an entire working project with one command. And from there you can start modifying it bit by bit which I'll cover later. So lets start with creating a project by going to the command prompt (Windows, which I'll use ) or terminal (OSX/Linux) and type the following command:
You see that this will create a structure and set of files which makes it possible to already start a test run on a test page with some test scripts and scenario's. This is one of the things I like about the lapis_lazuli gem. If the needed software is installed, it only takes seconds and you have a working test suite that you can modify.
Run the project
So let's give it a run, navigate into this folder, run the cucumber command and see what happens. And in case you wonder why your console output might not be colored like in my video, I installed ansicon as mentioned in a warning if you don't have it yet. It's not mandatory, the test runs fine without, but I like colors to recognize failing from passing tests easier.
The structure explained
You've created a project, performed a test run and saw the results. That's nice, but let's take a step back and talk about all the files and folder that have been created to understand what it all does. This is also explained on the testautomation.info website.Config folder
In the config folder you'll find four yml files. And the names speak for itself. Of course you can add more if needed later or remove the ones you don't need/use. But most likely you will use it all.
- config.yml - used for all configurations
- default_env
- points to Environment specific variables in config.yml
- use `cucumber TEST_ENV=...` to overwrite config.yml value manually
- default_device
- see devices.yml
- use `cucumber DEVICE=....` to overwrite config.yml value manually
- Keep in mind that Android does not like this value, see video
- close_browser_after
- Can be used to start clean after each scenario/feature or just close it at the end
- error_strings - I'll get back to this in a seperate blogpost
- And finally you see the Environment specific variables for default_env
- cucumber.yml - used for all cucumber configurations
- look at the `test:` config, you could type all this behind the `cucumber ....` command
- or you can add one here and use `cucumber -p profilename` while running cucumber
- devices.yml - used to store all your different device dimensions
- Add one with no values if you want to test on real/emulated devices, see video
- You notice that also user-agents are mentioned, this is to simulate a device by using specific dimensions and a user-agent, also see this testautomation.info page
- A nice list of pro's and con's can be found in this blog of spriteCloud
- users.yml - Here you store all the users specific information
- In this project used by authentication_helper.rb
Features folder
*.feature files
I'll start with the feature files since Cucumber will start here as well. The feature files are your Gherkin scenario's. Usually you split them up in seperate files per block of functionality or per part of the website you want to test. Whatever makes sense for your project. Just open the files and see the scenario's you just ran. Cucumber reads these line by line and searches for a corresponding line in the step definitions. For the next example open the 1_basic.feature file. Just keep in mind that technically it does not matter if the scenario starts with "Given", "When", "Then" or any of the other supported words. What matters is the part behind that. Only that will be linked by Cucumber with a match in any of the step_definition files.
Step_definitions
You'll see that for this generated project there is a file that is corresponding for each feature file. This is not mandatory, but could be handy. It al depends on how you want to set it up for your project and what makes sense for you. If you open up the basic_steps.rb file you will notice that the steps mentioned in the 1_basic.feature file are also shown here, but slightly more 'codey'. Cucumber is matching the scenario's from the feature file with the corresponding line in the step_definitions. One thing to keep in mind is that Cucumber looks in all step_definition files, so there is no need to link them in some way. This also means that the naming of the files doesn't matter. And you should avoid duplicate scenarios. (Again I say, "Given", "When", "Then" does not make it unique since it's being ignored by Cucumber, but it makes it easier to read).
A small example of how I use it, which is different from the default generated suite. I seperated the preconditions (given), interactions (when) and validations (then) into seperate step_definition files since there was overlap in functions on parts of the website I needed to test. So it did not make sense to write basically the same test for different parts of the website, I just wrote one given, one interaction and one validation step with some variables. So I still cover all seperate scenario's in the *.feature file, but I have only one of each in the step_definitions.
Helpers
In the feature file you see:
Given the user navigates to "blog"
In the step definition you see:Given the user navigates to "blog"
Given(/^the user navigates to (?:the )?"(.*?)"(?: page)?$/) do |page|
Nav.to(page)
end
And in the navigation helper you see:
def to(config_page_or_url, force_refresh = false)
url = self.set_url(config_page_or_url)
browser.goto url unless url == browser.url and !force_refresh
Nav.wait_for_url url
end
From this example you should be able to see that in the feature file, we keep it readable and understandable for anyone that reads it. It does not matter if a "Given" needs one or 20 steps, it's written as one line.Then in the step definition we put in a bit more logic and make it a bit more "codey" since we start to refer to functions form the helper. We define all the steps that needed to be taken, in this case only one.
And last you have the helper the one that contains the functions, in this case the function "to" which we use for navigation. In the helper we do all the codey stuff. Like getting the correct item(s) from the config files, making sure the browser performs the navigation action and if needed a refresh and last but not least wait for the url to be loaded.
This way, even a manager can help writing feature files. the steps can are easy to adjust is needed without coding to much, and all the codey stuff only has to be maintained in the helper and can be reused by as many scenario's/steps as needed.
Support
This folder contains the env.rb file in which you define all browsers you want to support (local/remote). But this is also the folder to store all your cucumber hooks. An example of what you can do with hooks can also be found in my blogpost about dealing with the browser alert message. But to get back to the env.rb file, here is an example of what I've added in there. It's not all, but you get the idea what you can do with it.
Whatever you add for browser you could now start via the command prompt by doing something like 'cucumber BROWSER=win10chrome'. Cucumber will look at env.rb and try to start the browser as mentioned in this file, in my case it will try to connect to a selenium-grid and forward specific capabilities (more about that in another blogpost).
Whatever you add for browser you could now start via the command prompt by doing something like 'cucumber BROWSER=win10chrome'. Cucumber will look at env.rb and try to start the browser as mentioned in this file, in my case it will try to connect to a selenium-grid and forward specific capabilities (more about that in another blogpost).
Other folders
The rest of the folders pretty much speak for themselves.- logs will contain the log files
- results can be used for results output
- screenshots will contain screenshots of failed tests (see config.yml for the setting)
Final words
So now you have your entire test framework setup in seconds, just by a simple command from the command prompt. And all thanks to the creators of the lapis_lazuli gem. Also you should have the basic understanding of what each file/folder is for. So the next step might be a bit easier, which is editing/tweaking this example project to your likes and turn it into a working test suite for your project. In the next blogpost I'll cover this part from front to end, but if you can't wait, I recommend to take a look at this page about element selection. Share, like, comment if this is useful to you or if you have any questions. Cheers!

Comments
Post a Comment